模組化必經之路 Composite Builds
在專案規模日漸增長的情況下,dependencies 的維護管理會隨著專案的複雜性與模組化使得管理越來越艱鉅,為解決這個問題 Gradle 7.0 推出了新的 Catalog 協助開發者來以更好的方式去維護管理 dependencies 的版本,且在新版的 IDE 也新增預設 catalog 這個選項了。
本篇會以兩大主題為主軸 Catalog & Composite Builds,可搭配官方文件一同食用此外一並附上 Sample Code,未來有機會可以搭配 Plugin 整合 CI/CD 自動化更新 Dependencies 版本,如果是營運的專案推薦還是手動管理為優,穩定性與風險較為可控。
為了更進一步優化專案,示範了複合式建構 (Composite Builds) 的方式來建置專案,幫助了解其中的差異及提升 Build time 的關鍵,讓你在模組化的康莊大道上走得更為愜意。
當然模組化不是一個必要項目是個選項,但會走到需要優化 build time 這步田地的專案一定也具備相當的規模了,如果是先天不良後天又失調的專案如何在有限資源改善目前狀況變成為非常重要的課題,不然醫美近年也不會這麼夯了。
Version Catalog
在 BuildSrc 時期我們會寫一個 object 來管理分類 dependencies 版本及類別概念就與現在的 catalog 相似,但少了 IDE support 很難看到版本更新提示需要開發者自己注意版本的更迭,當 dependencies 數量一多時會是非常困擾的問題。
Catalog 很大程度地解決這個問題,IDE 會幫你在 download 時去 check 版本,Group 相當於我們做的分類再搭配 bundles group 來做使用也可以達到我們自定義類別或是寫 extension 來分類的效果,如前言現在 IDE 已經支援 create default 了,但如果是現行專案還是需要 migrate 的來動手實作吧!
1. Create catalog file
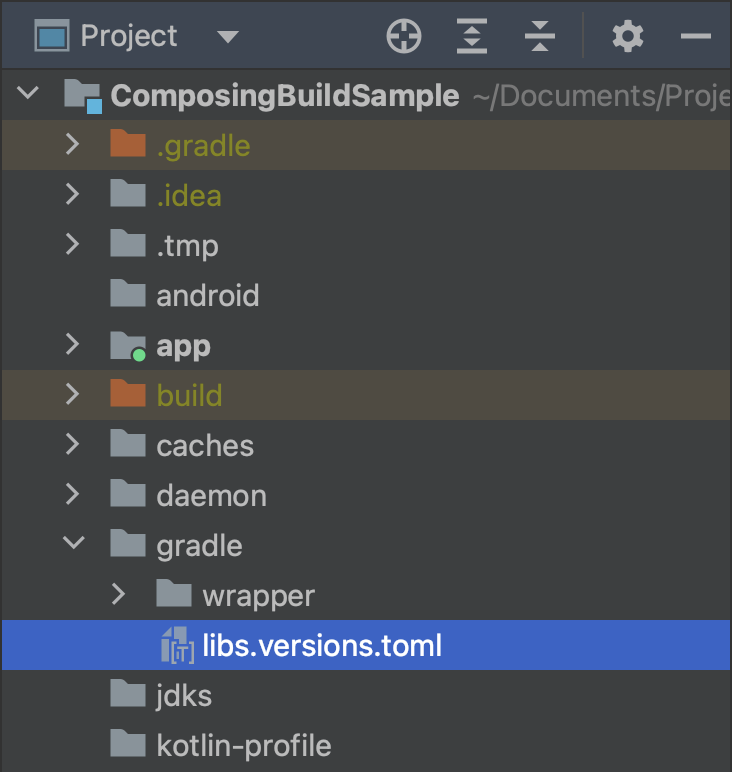
首先切到 Project 在這邊我們找到 gradle 這個資料夾,並 create 一個 file 檔名就叫 libs.versions.toml。
2. 在 Catalog 建立區塊
在官方文件上推薦可以先建立 versions、libraries、plugins 這三個區塊,分別可以管理版號、dependencies、與專案層級的 plugins。
1 | |
如果想要自定義 group name 也可以,官方推薦的命名樣式是小駝峰命名其中有保留一些關鍵字供系統使用,命名上須多加注意這幾個名字 class, extensions, convention 如果使用到會有問題。
Dependencies 的命名中間可以使用 - & _ & . 這三個字符去做區別,gradle 會自動轉換成. 所以不影響使用,範例如:compose-bom 👉 compose.bom。命名上需注意避免下列關鍵字 bundles, versions, plugins,可以參照官方原文👇
Some keywords are reserved, so they cannot be used as an alias. Next words cannot be used as an alias:
extensions
class
conventionAdditional to that next words cannot be used as a first subgroup of an alias for dependencies (for bundles, versions and plugins this restriction doesn’t apply):
bundles
versions
pluginsSo for example for dependencies an alias versions-dependency is not valid, but versionsDependency or dependency-versions are valid.
Sample toml file 可以如下面撰寫,name style 可以與開發團隊成員一同討論應該是保有相對應的自由度。
1 | |
3. Setting file path
目前 IDE 支援可以省略這步,但如果用舊一點的版本就需要手動去關聯檔案,所以需要在專案 setting.gradle.kts 中指定相對路徑,補上後 sync 即可。
1 | |
How to implementation?
Gradle 可以參考下方範例來做引用,plugin 使用 alias 來做引用,後續如果自定義 Composite Builds 的 Plugin 也是在下面這個區塊使用 id 來進行引用。
Dependencies 的部分就依照命名直接引用就好,IDE 也會 CodeCompletion 可以從提示小窗中選擇需要的 dependency,使用上非常方便。
1 | |
Composite Builds
Composite Builds 看中文有人把它翻作複合式建構,可以把專案想像成一間集團旗下投資了運動、運輸、餐飲等事業,這些事業群撐起了這整個集團的運作,但是今天單獨營運餐飲事業也是可以營運的,每個事業都有一定程度的相依但耦合度有沒有這麼高。
這就是 Composite Builds 的概念,也可以看到官網一開頭就寫了這句話 A composite build is a build that includes other builds. 如果還是有點難理解可以看看下面這張架構圖。
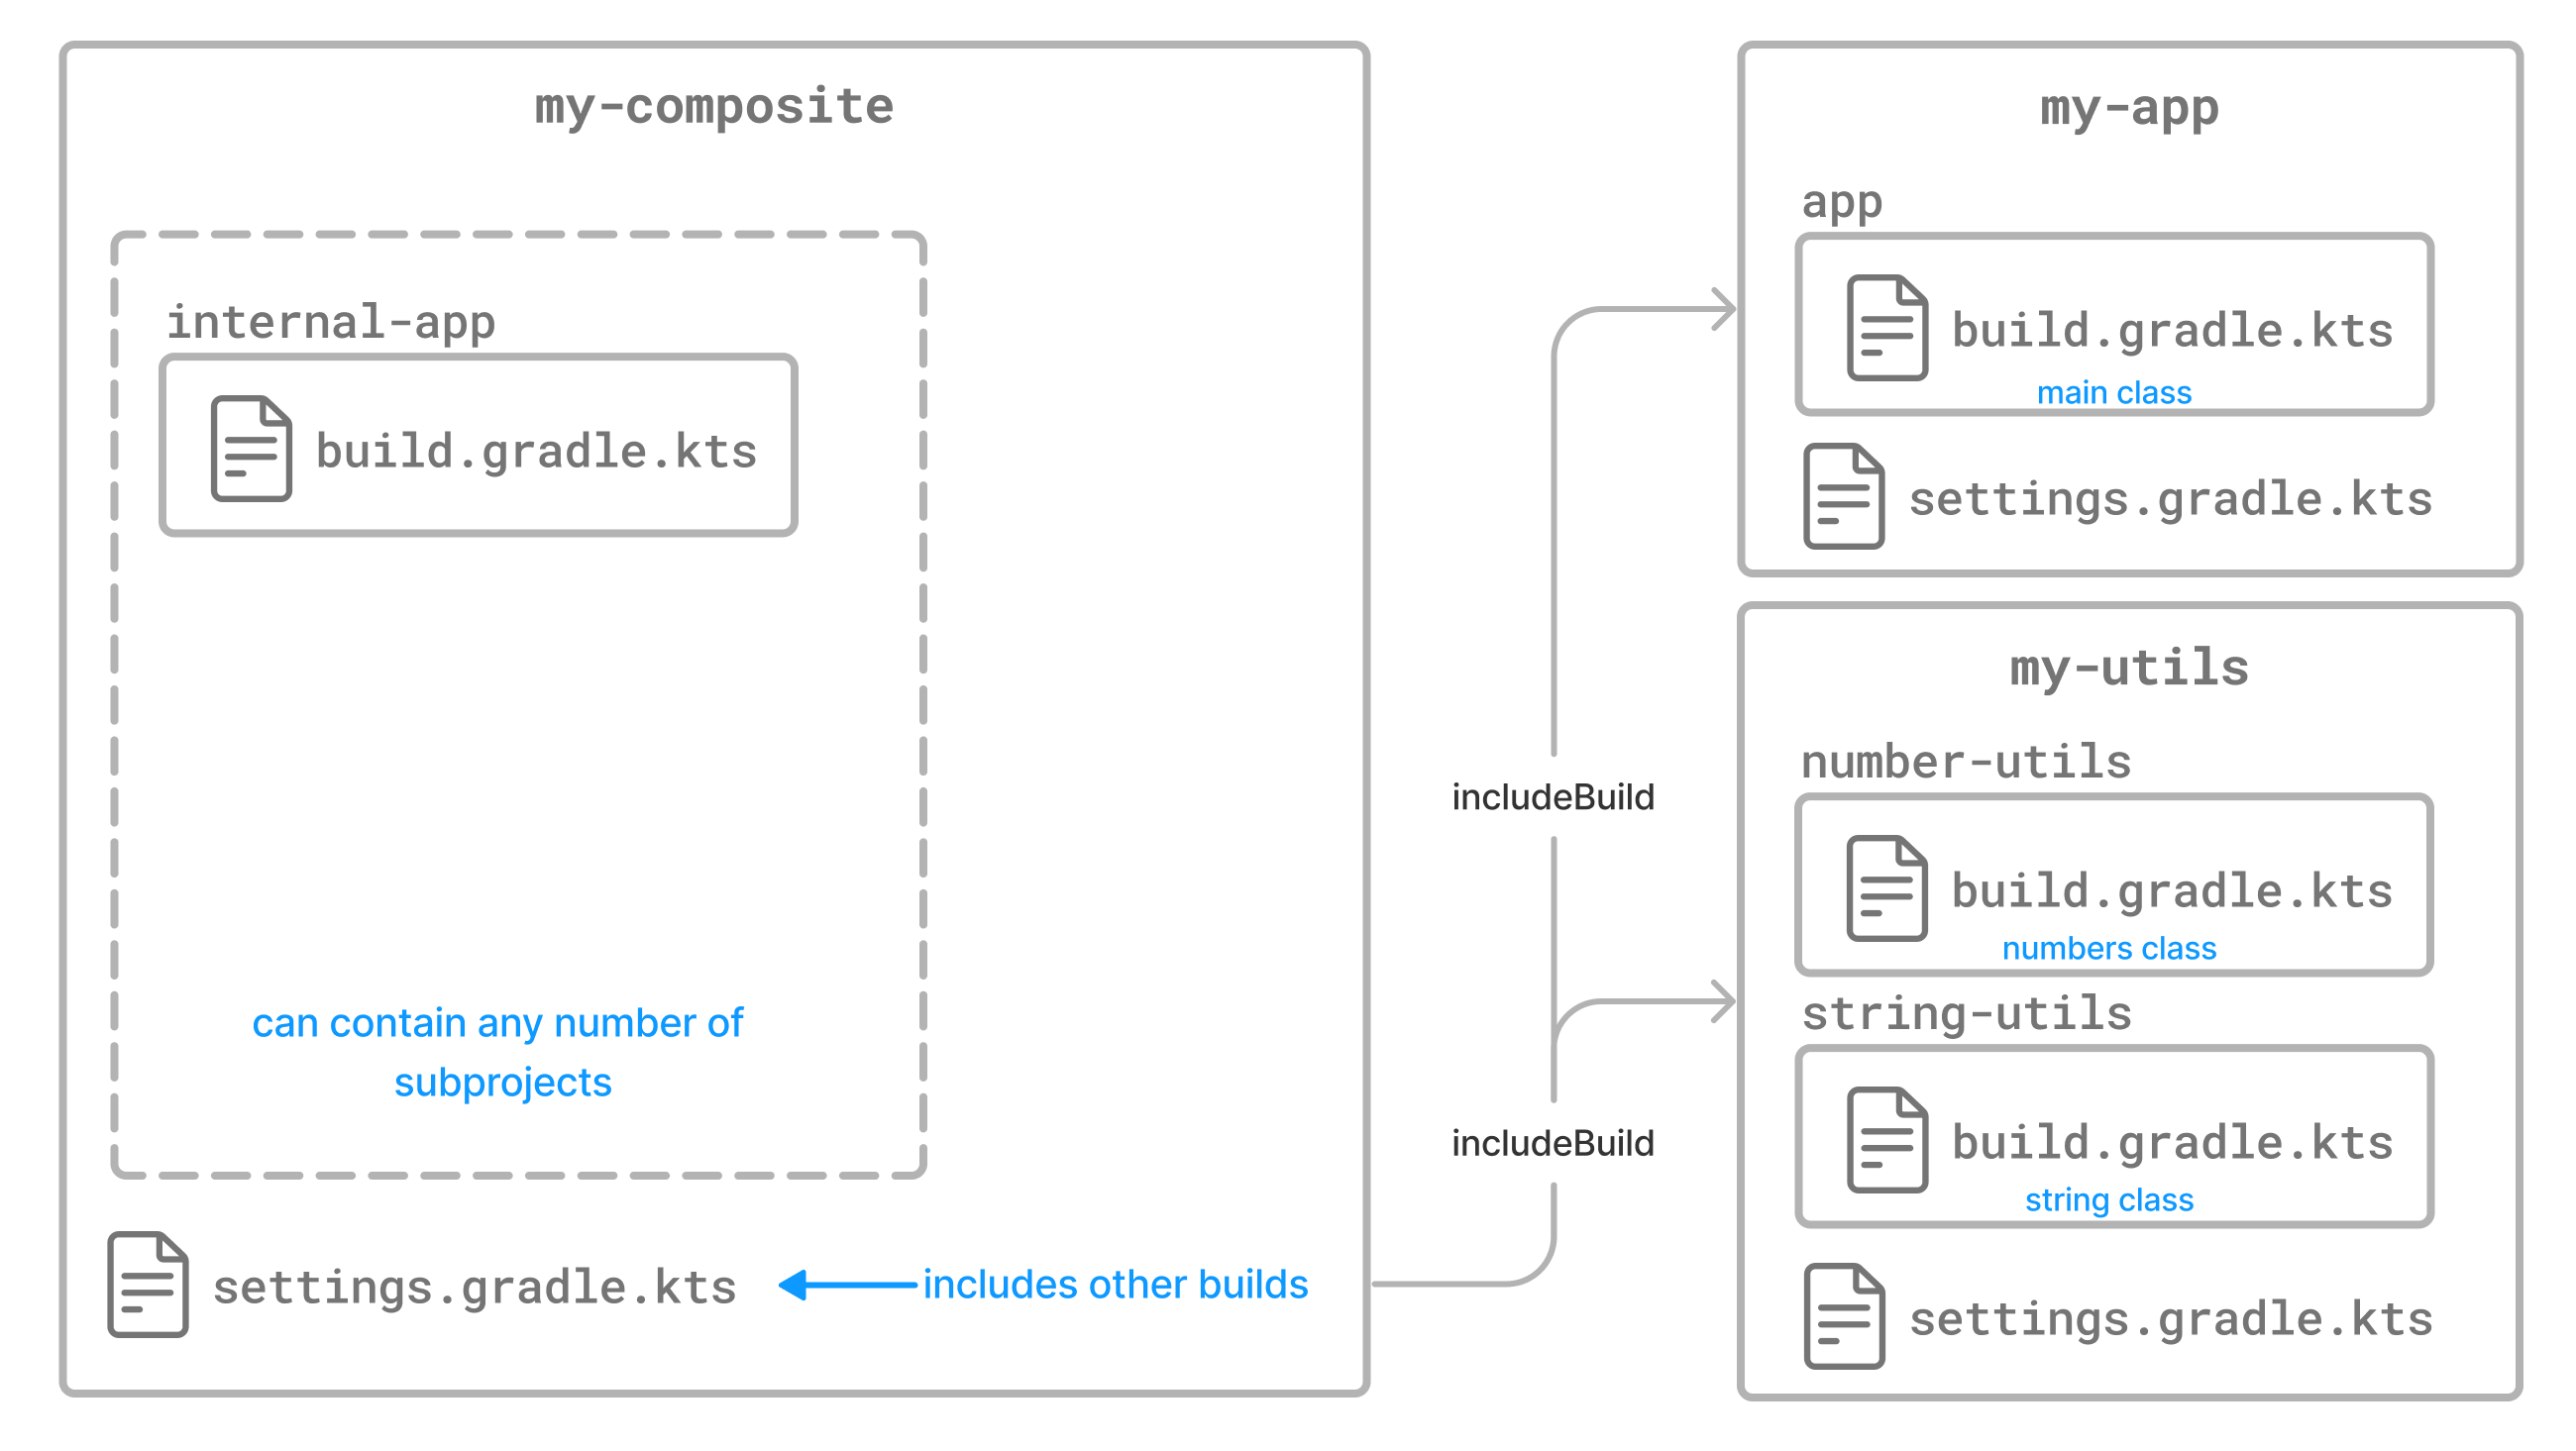
可以看到 my-app & my-utils 是 build 在 my-composite 這個專案裡面,但又自成一個方圓具備 build 及 settings 的 gradle 檔案,所以如果有需要獨立修改成一個專案是可行的。
Composite Builds VS BuildSrc
實作 Composing build 之前,可能有看過 buildSrc 在 Gradle 執行時會自動編譯 buildSrc 裡的程式碼,可以將共用程式碼抽取到 buildSrc 內部,後續只要引用該檔案即可有興趣的話可以看我的 Medium,因為篇幅關係這邊就不多做贅述。
回歸正題,為什麼拋棄 BuildSrc ??
可以從官方文件看出一些端倪,文中附上了備註意思就是雖然便於進行維護管理但只要有小更動就會 rebuild 整個專案,如果有需求時可以不要 rebuild 提升開發效率只是別忘了要定期去 rebuild 專案。
A change in buildSrc causes the whole project to become out-of-date. Thus, when making small incremental changes, the –no-rebuild command-line option is often helpful to get faster feedback. Remember to run a full build regularly or at least when you’re done, though.
此外 Jose Raska 分享了 buildSrc 需注意的一些要點,要點大意如下。
- dependency 更新會 rebuild 整個專案。
- cache 失效,不管是 Local build cache 還是 Remote Gradle cache。
- 剩下作者提及的
Iteration speed is slow有點不太知道要如何翻譯,但我這邊理解是重複 build 的速度很慢如果理解有誤也歡迎留言。
與 buildSrc 的不同在於 Composing build 是個別獨立的 module 每個都具備完整的 build gradle 並使用 include 方式來去組合一整個專案,所以如官方所述可以根據需求獨立或是合併各個 module 這也造就了這兩種 build type 先天體質上的差異。
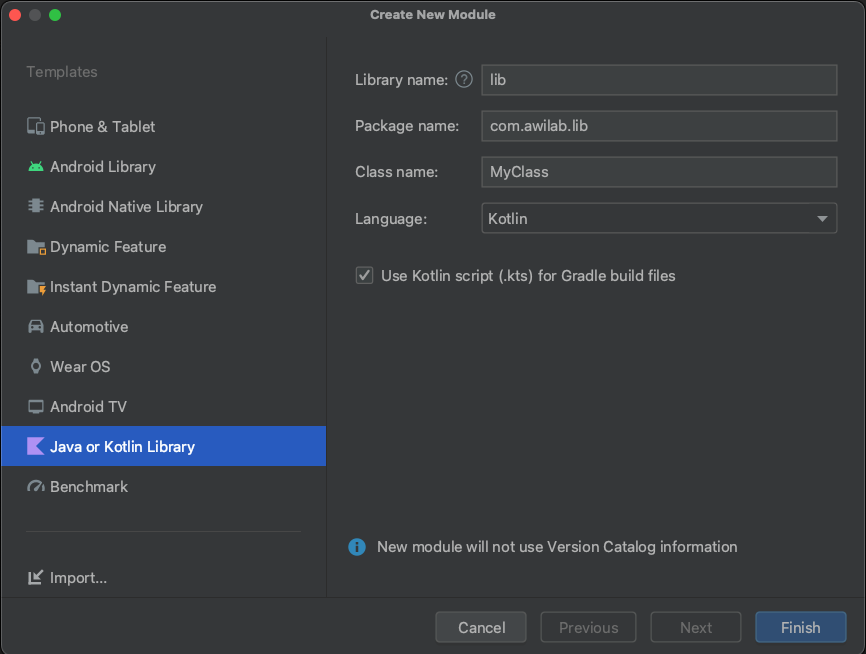
Create include build module
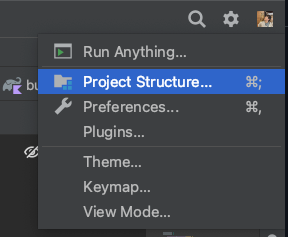
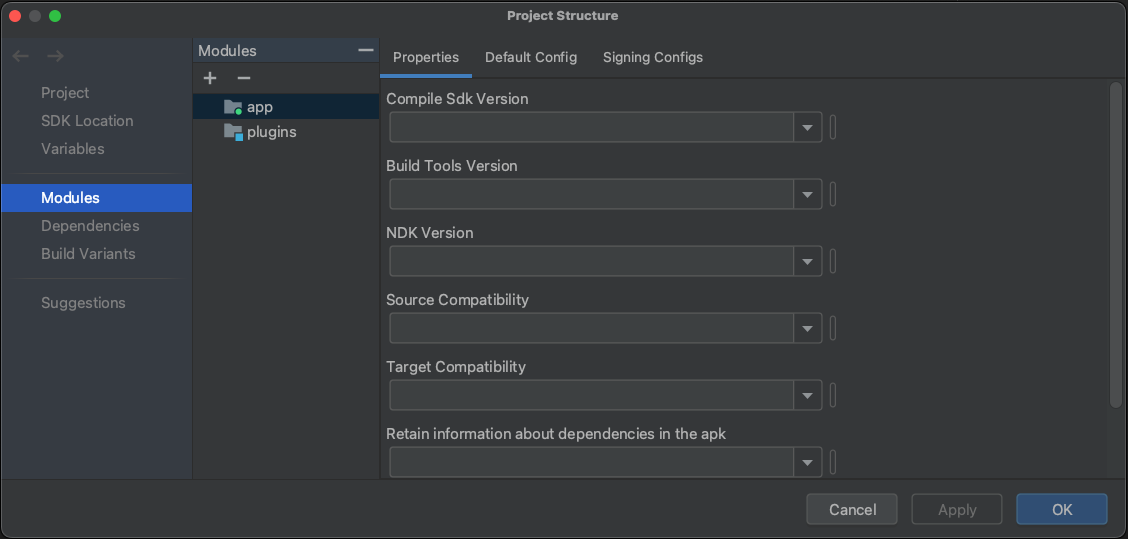
先點選右上角的小齒輪在 Menu 中選擇 Project Structure ,並在 Modules 中選擇 “+” 新增一個 Module 名稱可以隨自己喜好去修改,範例中是使用 plugins 來作為 Module Name,步驟可以跟著下方圖示。
Step 1.
Step 2.
Step 3.
到這邊 Gradle sync 完就告了個小段落,最後在該 Module create 一個 settings.gradle.kts 的檔案即可。
Module gradle
找到 Module 的 build.gradle.kts 加入下方的程式碼基本的設定這樣就可以了,但是我會需要在 Module 寫一些 extension 的東西所以看到 Sample 有加一些 dependencies 正常設定這樣即可。
1 | |
1 | |
Module settings gradle
Settings 的檔案是關聯 catalog 的,如果是新版 IDE 的話我記得不加這段依舊是可以吃到這個 toml 的檔案的。
1 | |
Gradle extension
因為 kotlinOptions 這個 function 蠻常被使用的所以就寫成 extension 的形式,方便之後在 Plugin class 呼叫。
1 | |
Plugin class
這部分算是 composing build 的核心,在這邊可以定義 plugins、defaultConfig 或是 dependencies 等,可以視情況需求寫一個共用的 plugin 未來開發上也可以省去很大一部分共用的程式碼,也可以避免有沒有修改到的問題。
後續各個 module 引用即可,接著來看看大框架如下透過 project target 去加入相關設定,需要注意的是 project extension 並沒有 kotlinOptions 所以在這邊必須 import 先前所寫的 CommonExtension,另一個是 configure 的 extension type 也會因應 modules 是 library 或是 application 有所不同。
1 | |
這三個區塊怎麼寫呢?下面就簡單提一下可以仿照有個概念,細節可以照著 Demo 來去實作。
Plugins
其實跟外面帶入 id 類似,但這邊要注意沒辦法在這邊宣告 com.android.application 跟 com.android.library 必須在外部 gradle 就宣告好這個 pluginDependencies,如果有更好的方法也歡迎告知我。
1 | |
Android Config
這邊就與 gradle 中 android config 設定差不多,版號的部分也是共用 object 所以可以看到 Demo 裡有 import 相關的檔案。
1 | |
Dependencies
這部分就很看個人了,可以寫成 DependencyHandlerScope extension function 或是像我這樣宣告一個 libs 的變數統一在 Catalogs 管理,會這麼選擇的原因是因為好像沒有必要特別再拉一個 extension function,catalog 都提供 group 的方式了,且 IDE 還支援版本檢查。
1 | |
Module build gradle
先前寫好了 Plugins class 我們接著要在 module 中的 build gradle 定義好 plugin id 跟 implementationClass 讓 IDE 知道需關聯哪個 Class 後續就可以在專案中加入客製化的 plugin 了。
1 | |
Apply customer plugin
Sync 完後只要在引用的 modules 宣告 plugins id 即可。
1 | |
Gradle Scan
這邊附上 Demo 的 gradle scan,如果要優化總是需要一份報告書作為佐證可以使用下方的 command 來產出這份報告,從報告的 time line 也可以讓人更瞭解初始化的差別。
1 | |
Demo 因為規模很小,如果換成大專案省下的時間會非常的可觀,這邊就附上目前專案上模組化後的 report time line 體感上就會差很多了。

總結
複合式建構 (Composite Builds) 和模組化 (Modularization) 從來都不是必要的項目但是卻是專案到一定規模必須做的項目,像是職涯選擇不一定需要接觸過 CI/CD 但成為好的 Team leader 前一定會需要懂,畢竟職能需要資源調度也需要為專案負責。理解哪些工作項目屬於值得花時間的投資項目,畢竟科技始終來自於惰性如何更舒服的上班也是很重要的課題。
專案成長超過一個閾值就會是一個非常值得的項目,因為小專案複雜度不高進行複合式建構及模組化後編譯速度成效非常的有限,就像本文中 Demo 的專案前後相差 2 秒體感有限。在我重構公司專案前跑一次起碼是 20 分鐘,每次 debug 成本都變得非常昂貴,這時就代表該停下來重新探討下工作項目,或是履歷表更新的時間因為未來的結果是可以預期的。
隨著模組化的精細度越高專案複雜度也會線性增長,所帶來的開發負擔及門檻也會提高,這個又是另一個值得探討的課題了。感謝看到這邊的各位,希望在某些程度上有所幫助範例程式在這邊,下次見!
参考
- Banner Photo by Jelleke Vanooteghem on Unsplash
- Sharing dependency versions between projects
- Migrate your build to version catalogs
- Using Version Catalog on Android projects
- Stop using Gradle buildSrc. Use composite builds instead
- How to manage dependencies between Gradle modules?
- Gradle doc - composite build
- 再见吧 buildSrc, 拥抱 Composing builds 提升 Android 编译速度
- 是时候弃用 buildSrc , 使用 Composing builds 加快编译速度了